PBN Bingo

The May 2023 issue of AOPA Pilot magazine includes PBN Bingo, an article I wrote to help pilots understand the key acronyms, abbreviations, and other terms associated with performance based navigation.

I also have a presentation on the topic on my YouTube channel: Unscrambling RNAV, RNP, and Other Chart Naming Conventions and Notes.

Mixing RNAV and an ILS

If you fly an airplane with a suitable RNAV system (for most of us, that’s an IFR-approved GPS navigator in the panel), you’re accustomed to flying RNAV (GPS) approaches and other procedures, such as RNAV departures and arrivals. And since most RNAV navigators currently in use also support flying ILS and VOR procedures, you also probably still fly the occasional ILS or VOR approach, even if you prefer all-GPS procedures.

But as the shift to Performance-Based Navigation (PBN) continues, the FAA is publishing more approaches that include–and sometimes require–using both GPS-based RNAV systems and ground-based navaids.

For other examples, see An ILS that Requires GPS, and the ILS OR LOC RWY 21 at KSTE in WI.

Consider the ILS or LOC RWY 12 at Huron (KHON), a small town in South Dakota.

In many respects, this is a typical ILS. It offers a DA at 200 AGL and requires 1/2 sm visibility (the RNAV (GPS) approach to RWY 12 offers the same LPV minimums). It also has an old-school locator outer marker (LOM) at BEADY that serves as the final approach fix for the LOC-only version of the approach and as the anchor for the missed-approach holding pattern.

But read the note in the required equipment box.

In most light aircraft these days, you must also have an IFR-approved GPS to fly the feeder routes and to identify BEADY, because your panel probably doesn’t include DME or an ADF.

ATC could provide vectors to steer you from the enroute environment to the final approach course. But as I’ve noted elsewhere, if you filed IFR as an RNAV/PBN-capable aircraft, a controller can clear you direct to any initial approach or intermediate fix, even if you’re flying a conventional procedure like an ILS.

The enroute chart for the area around Huron shows why you might expect such a clearance. The closest VOR at Watertown (ATY) is nearly 40 nm away, and the airways that converge at KHON are all GPS-based T-routes. The VOR at HON has been decommissioned; only the DME component remains (for more information, see Stand-Alone DMEs on Charts).

A controller can avoid issuing a series of vectors and altitudes as you fly toward the airport and offer one simple instruction, “Cross HUMSO [or WEDEM] at or above 3000, cleared for the ILS RWY 12 approach.”

Your task is to brief the plan for changing from GPS guidance to fly the feeder route from either HUMSO or WEDEM to “green needles” to intercept and track the localizer as you turn inbound toward the airport. And decide, if necessary, how you’ll fly the missed approach.

So today, even if you’re flying to a GA airport far from the big city, you should be prepared to load and fly such hybrid procedures if, for training or practice, you want to fly an ILS, LOC, or VOR approach.

RNP: Performance Monitoring in Light GA Aircraft

The discussion of RNP–Required Navigation Performance– in AIM 1−2−2. Required Navigation Performance (RNP) and other FAA guidance confuses many pilots because the usual definition of RNP focuses on the type of equipment typically installed in bizets and airliners, not light GA aircraft.

Here are the key sentences in that AIM description of RNP:

RNP is RNAV with the added requirement for onboard performance monitoring and alerting (OBPMA). RNP is also a statement of navigation performance necessary for operation within a defined airspace. A critical component of RNP is the ability of the aircraft navigation system to monitor its achieved navigation performance, and to identify for the pilot whether the operational requirement is, or is not, being met during an operation. 

TBL 1-2-1 in the AIM shows the values, in nautical miles, associated with each standard RNP level.

Most GA pilots are concerned with only the RNP APCH (0.3 to 1.0), Terminal (1.0), and En Route (2.0) RNP levels.

For more information about how RNP, RNAV, and related notes are used on IFR approach charts, see Unscrambling RNAV, RNP, and Other Chart Naming Conventions and Notes here at BruceAir.

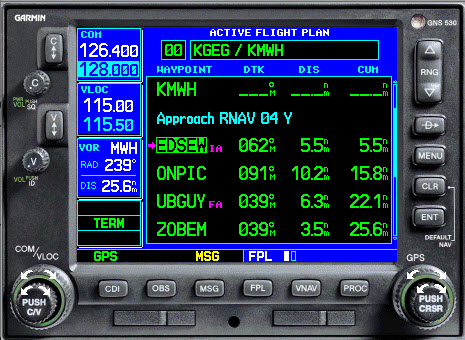
Unlike the FMS and other equipment in jets, the displays in the suitable RNAV systems (i.e., GPS and WAAS navigators) and PFDs installed in our aircraft usually don’t show numerical values for RNP levels. So how you verify that your system is achieving the required navigation performance during different phases of flight?

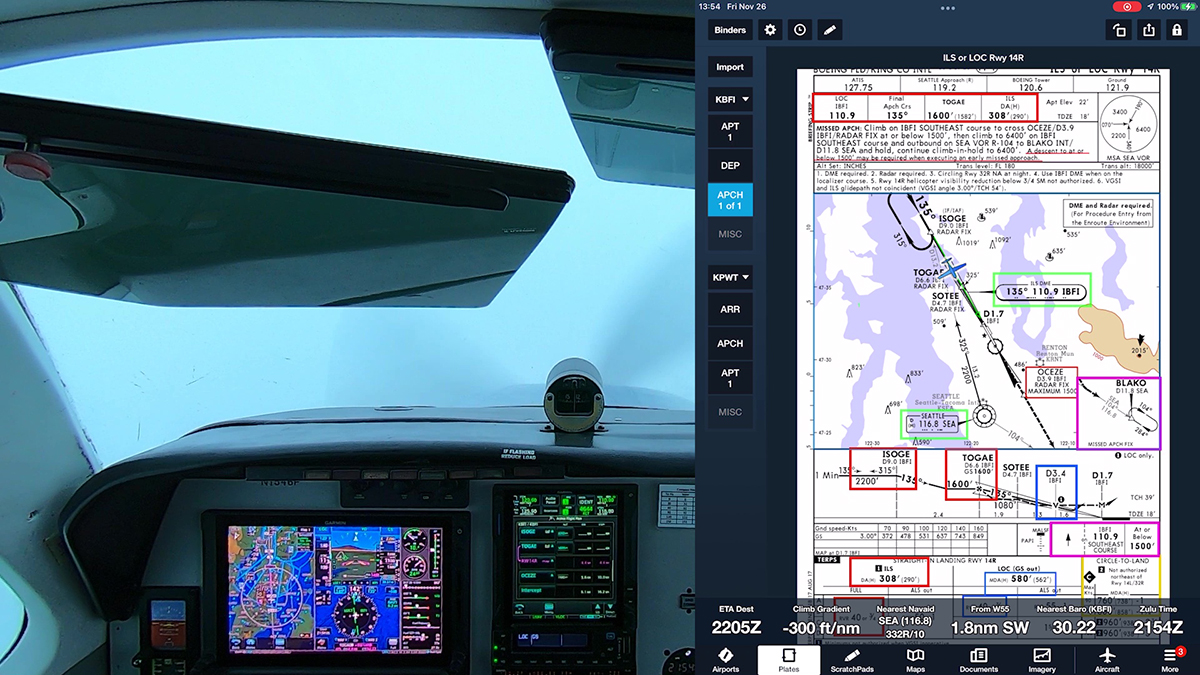
The avionics common the light GA world typically annunciate RNP status by displaying ENR, TERM, LNAV, LPV, LP, etc., as described in the tables below from the Garmin Pilot’s Guide for the GTN series (190-02327-03D).

These letter-based RNP annunciations typically appear on the PFD near or within the HSI and on the screen for the navigator, as shown in the examples below.

A table below from the Pilot’s Guide for the Garmin G500 Txi (190-01717-10 Rev. J). provides similar information.

The LNAV, LNAV+V, LPV, LP, LP+V, and (rarely LNAV/VNAV or L/VNAV) annunciations are associated with the RNP APCH level, which is 0.3 nm for basic lateral navigation and is also used for the tighter, angular courses defined for the localizer-like final approach segments established for approaches with LPV and LP minimums.

FAA is preparing a new advisory circular, AC 90-119, which should consolidate and clarify guidance about performance-based navigation (PBN), RNAV, RNP, and related topics in one document. I submitted comments asking that tables like those above be included in the sections that define RNP values and explain how typical GA pilots can meet the requirement to monitor RNP while operating under IFR.

For a detailed look at the draft of the new AC and to see my comments, see Draft AC 90-119 Performance-Based Navigation Operations here at BruceAir.

Unscrambling RNAV, RNP, and Other Chart Naming Conventions and Notes

Many pilots are confused by the terms RNAV, RNP, and RNP APCH that appear on instrument approach charts, and it’s easy to see why.

Although ICAO is adopting a new naming standard as the world shifts to Performance Based Navigation, or PBN, the FAA is sticking to its conventions. And that approach leads to some terms having more than one meaning or to blurring important distinctions.

This video below takes a closer look at what those abbreviations, initialisms, and notes mean.

You can watch videos on other topics at my Presentations for Pilots playlist on YouTube.

For more information on this topic, see:

RNAV Approach at Rural Airport

The Seattle area offers a variety of airports for IFR practice. The flight in the video below takes me from busy Boeing Field (KBFI) to Sanderson Field (KSHN) at Shelton, WA, a non-towered airport just 40 miles southwest of Seattle.

Flying approaches at Sanderson demonstrates how GPS has transformed IFR for light GA aircraft. The airport once had only an NDB approach. Now it has RNAV (GPS) procedures to both runway ends, and the approach to RWY 23, which you’ll see in this video, offers LPV minimums as low as 250 ft AGL and ¾ mi visibility, almost as good as those provided by a category one ILS.

The minimums are a little higher for several reasons—most importantly, RWY 23 does not have an approach lighting system to help guide you in during LIFR conditions. During preflight planning, it’s important to review such details so that you’re not surprised by the view when you break out of the clouds, especially when you are arriving at a relatively quiet, rural airport like Sanderson Field.

Note that this approach has two lines of LPV minimums—one set with a DA of 523 ft and ¾ mi visibility, another with a higher DA of 667 ft and visibility requirement of 1-1/4 miles. Which applies when you fly the approach?

The answer is provided by the hashtag associated with the lower LPV minimums.

The hashtag links to a note at the top of the chart, if you use FAA charts. The note explains that you can use the lower LPV minimums only if, while flying the missed approach, your airplane can achieve a climb gradient of 244 ft/nm until reaching 1700 ft, when the standard terminal climb gradient of 200 ft/nm applies.

Confirming that you can achieve that higher climb gradient requires using the aircraft performance data in the aircraft flight manual or POH, and checking the results against a climb rate/climb gradient table, such as the one published in the Chart Supplement.

As I’ve explained in other videos, I made my own table to more accurately reflect the performance of the aircraft that I fly, and I have rounded up the climb rate numbers to the next highest 100 fpm, a value that I can see on the instruments in the panel.

Ride along as I explain some of the preflight planning process and describe how I use the Garmin G500 TXi, GTN 750Xi, and GFC 600 autopilot in the Beechcraft A36 Bonanza.

Seattle to Pasco: A Scenic Flight

Mostly clear skies—except for smoke from the many wildfires in the Pacific Northwest—tempted me to fly across the Cascades to show how quickly and dramatically the scenery changes during even a relatively short flight in this part of the U.S.

This early morning takeoff from runway 32L at Boeing Field (KBFI) includes views of the Seattle skyline as I climb and turn southeast to join the V2 airway toward Ellensburg and then on to Pasco (KPSC), largest of the so-called Tri-Cities in central WA along the Columbia River.

I explain how the CBAIN ONE RNAV departure works at Boeing Field, and I outline my planned route across the mountains into the arid south-central part of Washington state. Although the battery in the wingtip camera didn’t last for the entire trip, you still get a good view of the approach and landing at Pasco, which has become an increasingly busy passenger terminal for regional airlines.

Two Views of an Instrument Approach

An overnight surge of marine stratus into Seattle brought another opportunity to fly instrument approaches in IMC—even in mid-July.

The video below shows the short hop from Boeing Field (KBFI) to Tacoma Narrows (KTIW) for the RNAV (GPS) RWY 17 approach almost to the published LPV minimums.

The second video shows the same approach flown about a month earlier in mostly visual conditions. As I have noted before, it’s a good idea to have instrument students fly their first approaches in VMC, hood or Foggles off, so that they can compare the movements of the course and glidepath indicators with the view of the runway. They also see the terrain and obstacles along the approach path, which helps them understand the importance of remaining on the published courses and never going below the minimum altitudes as they descend.

Practicing Instrument Approaches in IMC

I recently took advantage of solid IMC in the Seattle area to fly several instrument approaches. Flying in actual instrument meteorological conditions is different from practicing with a view limiting device (e.g., a “hood”), especially when the visibility beneath the clouds is limited.

Ride along via the videos below as I depart Boeing Field (KBFI) in Seattle to fly the RNAV RWY 20 and ILS RWY 20 approaches at nearby Bremerton National (KPWT) and then return to KBFI via the ILS RWY 14R.

Track of my practice flight.

For more information about my techniques for preparing to fly instrument approaches, see Briefing IFR Procedures here at my blog.

If you’re interested in my recommendations for reviewing and annotating instrument charts, see Annotating IFR Charts, also here at BruceAir.

Don’t Activate Approaches

Here’s a potentially provocative statement: Don’t activate approaches.

As I have explained in other posts (list below), with most modern GPS navigators, there’s no need explicitly to activate an approach. Activating an approach isn’t magic–that step simply makes the initial fix (called the “transition” in Garmin and other navigators) the current direct-to waypoint.

Don’t activate approaches

In many–perhaps most–cases, proceeding direct to the initial fix you choose when you load an approach is not what you–or ATC–want the navigator to do, at least right now. ATC may assign vectors to the final approach course or clear you to a different initial fix. In particular, if you activate vectors to final (VTF), the fix you need may no longer be visible and available on the moving map and flight plan page, leading to what I call the vectors-to-final scramble. But loading an approach early, with an appropriate initial fix, gives you time to review and brief the procedure–and to prepare for changes that ATC may make to your best-laid plans.

More information:

Avoiding the Vectors-to-Final Scramble

Flying Instrument Approaches without Activating the Approach

Setting a Course v. Vectors to Final

Changes to Vectors-to-Final in Garmin GTN System 6.x

New ATC Phraseology for RNAV Aircraft

A Procedure is Waypoints

When you fly an RNAV approach with a GPS navigator, the system performs a series of calculations and internal tests, such as confirming GPS signal accuracy and precision. As you proceed along feeder routes or vectors toward the final approach fix, the navigator also smoothly narrows the course width from en route to terminal to approach scale, and finally it displays the best available minimums for the approach given your system’s capabilities. But from your perspective in the cockpit, an approach–even when you use a GPS to complement a conventional approach such as an ILS–is essentially a sequence of waypoints, like other legs of a flight plan. Understanding that fact and knowing how to work with flight plans are the keys to setting up an approach and confirming that the procedure is progressing as you expect.

To help you practice using its avionics, Garmin offers free PC-based and iOS trainers (simulations) of its navigators:

On the flight plan page, if the active leg or direct-to fix is below the procedure title, the approach is active.

Instead of explicitly activating an approach, follow these steps to load and fly an approach (the same basic technique also works when flying STARS):

  • Load the procedure you want to fly.
  • For transition, choose a fix appropriate for the direction from which you’re arriving.
  • Load, but don’t activate, the approach. Review the procedure. Wait until you confirm that you’ll receive vectors to join a segment of the procedure or until ATC clears you direct to an initial fix.
  • If ATC vectors you to join a feeder route/transition or the final approach course, activate the appropriate leg of the procedure.
  • If ATC clears you to a fix, proceed direct to that fix.

This technique also keeps the fixes in the flight plan should you want to fly the approach again after flying a missed approach or if you need more time to configure the airplane or deal with a distraction.

Consider the the RNAV (GPS) Y RWY 4 at Moses Lake, WA (KMWH). If you approach KMWH from the east, choose ONPIC or MWH as the transition. If you arrive from the west, choose EDSEW, RUBEL, or ONPIC.

If ATC provides vectors to join the final approach course between ONPIC and UBGUY (the FAF), activate that leg.

But if ATC clears you to MWH, ONPIC, RUBEL, or EDSEW, you can still easily proceed direct and fly the approach beginning at that new point.

Here’s what a sequence beginning at MWH looks like in the Garmin GNS 530W simulator.

Loading the RNAV RWY 04 Y approach with MWH as the transition (initial fix).

The map view shows all the fixes and the course reversal.

The approach title appears in the flight plan, with the fixes after MWH available.

You can proceed direct to MWH to fly the full procedure. Or, to accept vectors to the final approach course, delete the hold and activate the leg between ONPIC and UBGUY.

If you arrive at KMWH from the west, EDSEW is a logical choice for the transition.

Loading EDSEW keeps other fixes in the flight plan and visible on the map.

If you are cleared and proceed direct to EDSEW, the approach is active–because the current direct-to fix is below the procedure title.

If ATC vectors you to join the final approach course outside UBGUY (the FAF), you can activate the leg to UBGUY.

Select UBGUY, press MENU, and choose Activate Leg.

Confirm that you want to activate and fly the leg ONPIC to UBGUY.

The flight plan page shows ONPIC to UBGUY is the active leg.

The active leg (magenta) on the map helps you anticipate the intercept.

Note that with UBGUY, the FAF, as the end of the active leg, the GPS annunciates LPV, another confirmation that the approach is active.

Another Example

Here’s a similar sequence using a Garmin GTN 750 to fly the RNAV (GPS) RWY 34 approach at Arlington, WA (KAWO), north of Seattle. The steps follow the basic logic and presentation used in the GNS 530W.

Here’s flight plan from KBFI to KAWO with SAVOY as an enroute fix above the procedure title. SAVOY appears again below the procedure title as an IAF.

When ATC clears you direct SAVOY, select the instance of SAVOY labeled as an IAF, below the procedure title, and choose direct-to.

Now SAVOY is the active fix, and because it’s below the procedure title, the approach is active.

If you have an electronic PFD such as the Garmin G500 TXi, the waypoint sequence appears below the HSI. Here it shows direct SAVOY (an initial fix), with YAYKU, the FAF, as the next waypoint in the sequence–another confirmation that the approach is active.

As you continue, the GTN 750 sequences to the remaining fixes in the approach toward the missed approach point. The GTN annuciates LPV, confirming the approach is active. If you go missed, the waypoints sequence through to the published missed approach hold.

RNAV Approach at KCLS

I flew an RNAV (GPS) approach at Chehalis, WA (KCLS) to show how low LPV minimums can take you, even to a runway at a typical small-town, non-towered airport that doesn’t have approach lights and other components associated with precision approaches. I flew this procedure in VMC to help you see the runway environment.

Now, an RNAV (GPS) approach to LPV minimums isn’t technically a precision approach, at least according to the current ICAO definition of the term. But as a practical matter, flying to a localizer performance with vertical guidance DA is just like flying an ILS. The lateral guidance funnels you toward the runway, just like a localizer, and the glidepath generated by the GNSS box in the panel acts just like an ILS glideslope. In fact, I prefer flying an LPV approach even when an ILS is available. You don’t have to switch navigation sources, there are no false glideslopes, and there is no ILS critical area.

If the runway served by the RNAV (GPS) approach doesn’t also have an ILS, you probably won’t see approach and runway lights except for edge lighting. And the minimums (DA and visibility) will be a little higher than they would be for a typical category 1 ILS (i.e., 200-1/2). At KCLS, the LPV minimums are 300 AGL (DA 476) and 1 mile.

But those minimums are a substantial improvement over the LNAV MDA (900 MSL; 724 AGL), the lowest you can go without the approved vertical guidance available with WAAS.