
My article about partial-panel IFR flight with modern electronic instruments, complemented with EFBs, is in the April 2024 issue of AOPA Pilot magazine.
If you’re an AOPA member, you can read it online here.

My article about partial-panel IFR flight with modern electronic instruments, complemented with EFBs, is in the April 2024 issue of AOPA Pilot magazine.
If you’re an AOPA member, you can read it online here.
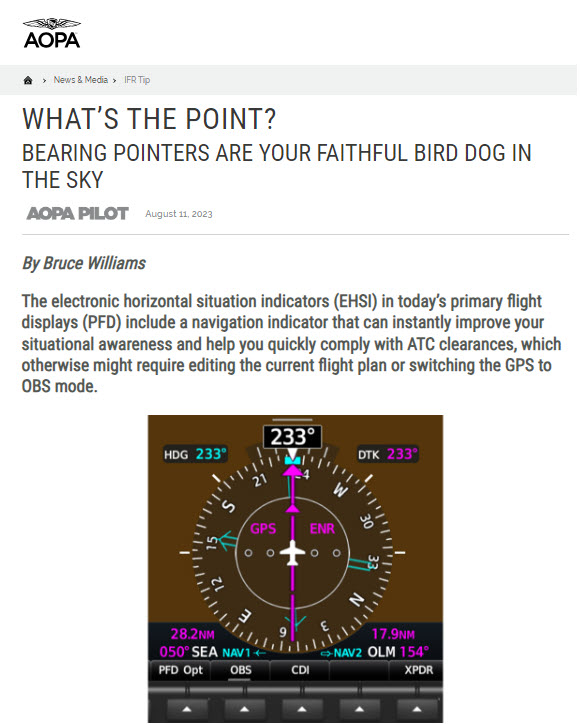
To learn how bearing pointers can help you develop and maintain situational awareness, follow this link to my article in the September 2023 issue of AOPA Pilot magazine.
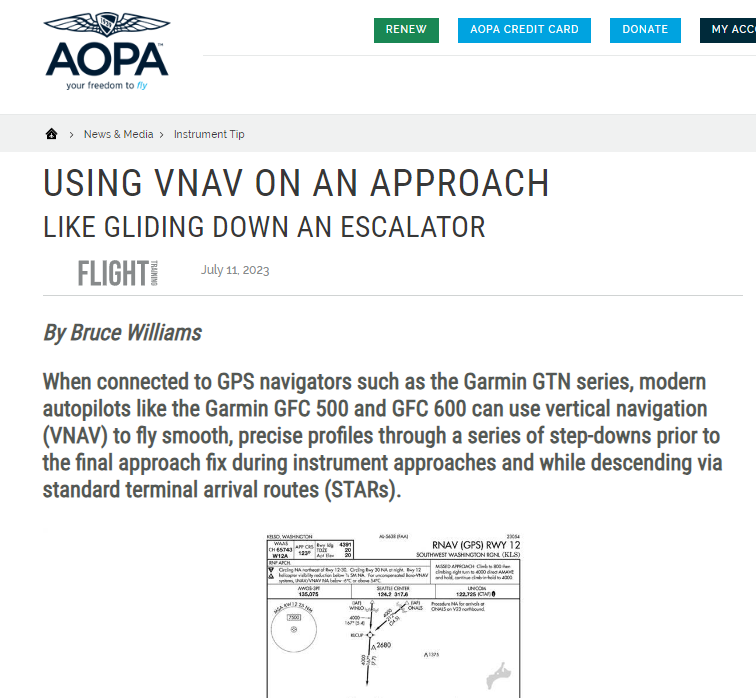
My article about using VNAV is in the August issue of AOPA Flight Training magazine, here. I tried to address the most common questions and mixups that I see when folks use VNAV while flying approaches.
To see VNAV in action, watch this video at my YouTube channel.
The May 2023 issue of AOPA Pilot magazine includes PBN Bingo, an article I wrote to help pilots understand the key acronyms, abbreviations, and other terms associated with performance based navigation.
I also have a presentation on the topic on my YouTube channel: Unscrambling RNAV, RNP, and Other Chart Naming Conventions and Notes.
I’ve been testing the latest system software in my Garmin avionics and checking out the A36 after its annual inspection. A break in the weather allowed a scenic VFR flight from Boeing Field (KBFI) to Tillamook, OR (KTMK) and a practice RNAV RWY 13 approach using the automation available with the Garmin GTN 500Txi, GTN 750Xi, and GFC 600 autopilot.
Enjoy the spectacular scenery along the Oregon coast south of Astoria as I descend into KTMK.
Sometimes just one cloud gets in the way when you’re flying an instrument approach.
In this video, I fly the RNAV (GPS) RWY 35 approach at Olympia, WA (KOLM), southwest of Seattle. Although the weather was mostly good VMC, and the Olympia airport was operating under VFR during my flight, as you’ll see, I had to go missed on the approach when I reached the MDA on this LNAV-only procedure because just one cloud blocked the view of the runway.
Because I have a WAAS-capable Garmin GTN 750Xi in the panel, I almost always have at least advisory vertical guidance when I fly an approach. The GTN shows +V to indicate an advisory descent path when you load a procedure like the RNAV (GPS) RWY 35. That capability lets me fly almost all approaches using the same profile and aircraft configuration that I use for an ILS or RNAV approach with LPV minimums.

On this day, had I intended to land, I could have leveled off at the MDA and continued toward the published missed approach point, and I probably would have been in the clear before I reached the threshold. But that strategy might have left me too high to make a smooth, stable descent to the runway. Indeed, on this day, with the airport itself essentially in the clear, had I really wanted to land, I could have canceled IFR well out along the final approach course and followed the tower’s instructions to enter a VFR traffic pattern.

But in actual IMC or marginal VMC, when I descend using an advisory +V glidepath, I use the point at which I reach the MDA as the missed approach decision point. By design, the intersection of the advisory glidepath and MDA typically puts you close the charted visual descent point (if a VDP is available). That’s the point at which you can leave the MDA and continue to the runway in a stable, normal descent.

This approach also helps illustrate another useful technique. As you’ll hear, I told the approach controller that I could accept vectors to the final approach course instead of flying a feeder route or course reversal. But as that plan came together, I didn’t use the VTF option in the GTN.

Instead, I selected CETRA, an IF, as the transition when I loaded the approach. Then I activated the leg of the procedure that ends at the FAF, CORER. The GTN drew a magenta line extending out from the FAF that I could use a reference as ATC vectored me to join the final approach course.
That technique avoids what I call the “vectors-to-final scramble.” Selecting an appropriate initial fix and then activating a leg or proceeding direct to a fix below the procedure title both activates the approach and preserves your options should ATC need to change the plan or, if you go missed and want to give the approach another try.
Here’s a look at a mostly bygone type of instrument approach: a PAR—precision approach radar—procedure. When you fly a PAR, a specially trained controller uses a short-range, highly accurate radar display to talk you down. The controller guides you left and right to remain on the extended runway centerline while also directing you to adjust your descent to follow the proper vertical path. In effect, you fly an ILS, but instead of using localizer and glideslope indicators to help you remain on track, you follow the controller’s instructions.
PAR were standard practice, especially at military airfields in the decades following World War II. You can see dramatized, but realistic depictions of PAR in movies, such as the conclusions of Strategic Air Command, starring Jimmy Stewart, and the first film in the Airport franchise, released in 1970.

The PAR controller in Airport (1970)
The radar displays and other electronics have been updated since, but the basic process remains the same even today. Although a PAR could be useful in an emergency, as in those films, today it’s unlikely that you’ll have a radar approach available nearby if your primary navigation equipment fails. But as I’ll explain a bit later, flying PAR approaches is still an excellent exercise.
In the U.S., only about 100 approaches with “radar minimums” remain in the system. Most of those procedures are at military bases, and the armed forces still use PAR in daily operations.

Some military facilities allow civilian aircraft to fly practice PAR approaches. The controllers need to practice guiding aircraft in, and they’re usually happy to provide the service. You just can’t touch down on the runway at the end of the approach.

In this video, I flew the PAR runway 15 at Gray Army Airfield (KGRF) near Tacoma, WA. It’s mostly home to helicopters, but it also serves fixed-wing aircraft and is part of the Joint Base Lewis-McChord complex.

There is no approach chart for a PAR. Instead, the critical details for radar procedures are shown in the “radar minimums” listings in the Terminal Procedures Publication for each region in which radar approaches are available.
Often when pilots fly a PAR, they load the corresponding ILS for the runway as backup. But for this video, I didn’t want to reference LOC and GS displays. Instead, I hoped to use the PAR to make an important point about instrument flying. As you’ll see, following the controller’s verbal commands forces you to use the control-performance method of instrument flying. You don’t have needles to chase, so you must smoothly and precisely fly specific headings while simultaneously making small pitch and power adjustments to track the correct vertical path. A PAR is a great exercise in precise aircraft control.
Here’s a link to a new (to me at least) FAA website that provides details about airports with histories of runway incursions, complex layouts, etc.: https://www.faa.gov/flight_deck.
The preceding link is to an interactive map that shows the airports with dedicated web pages and videos.

Skagit Regional Airport (KBVS) near Naval Air Station Whidbey Island is a scenic gateway to the San Juan Islands and, in the early spring, a hub for sight-seeing flights over the area’s famous tulip fields.

On this day in early January 2023, however, the airport, which lies at the end of gap in the mountains to the east and near a bay that opens into Puget Sound and the Strait of Juan de Fuca, showed why it’s also a good destination when you want to practice crosswind landings.
Join me as I fly a VFR practice RNAV (GPS) approach to runway 11 with gusty winds out of the northeast.
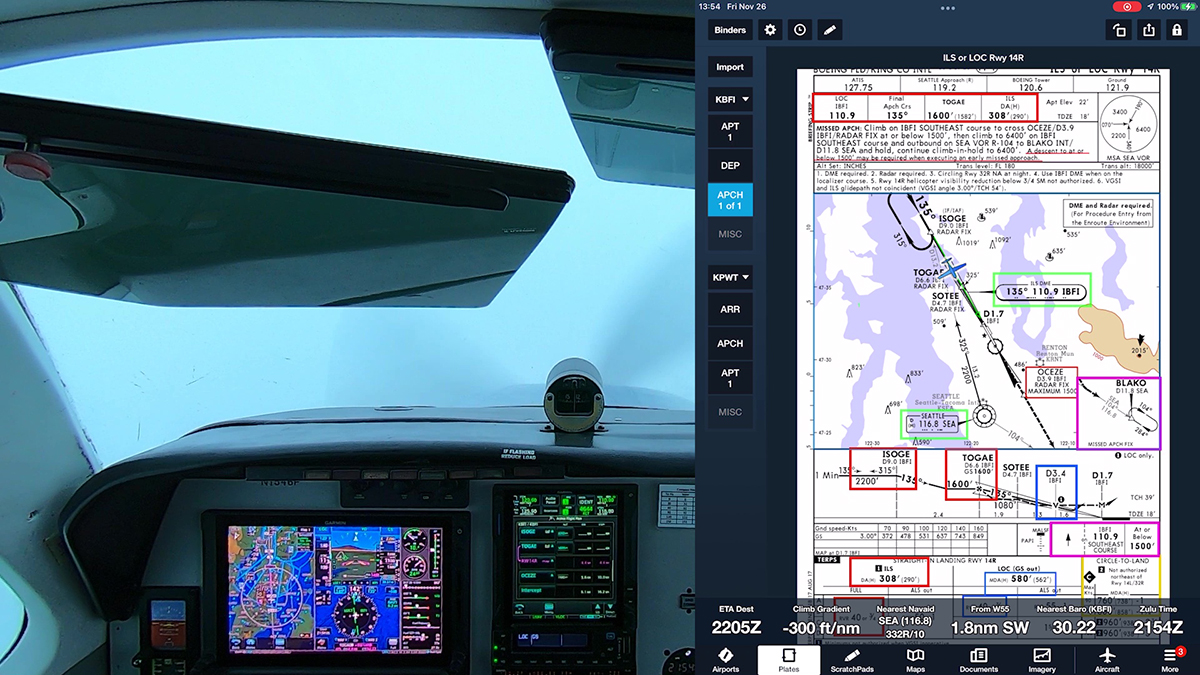
After flying a low approach at Port Angeles (KCLM) on the north side of the Olympic Peninsula, I picked up my clearance back to Boeing Field (KBFI), which was in a south flow, using runway 14R and 14L.
ATC typically vectors IFR traffic from the north or northwest—from points such as the San Juan Islands and airports on the Olympic Peninsula—to join the localizer for 14R (in fact, ATC really wants you track the final approach course; the LOC is just the time-honored way of accomplishing that goal). Often the clearance comes when you’re 30 to 40 miles from the airport, well outside the 18 nm standard range for a localizer.
When I receive such a clearance, I use a technique, demonstrated in this video, that’s available in most GPS navigators (for more information, see Setting a Course v. Vectors to Final).

A November 2022 update to the AIM includes a note in paragraph 1-1-9 Instrument Landing System, explaining that:
Unreliable signals may be received outside of these areas. ATC may clear aircraft on procedures beyond the service volume when the controller initiates the action or when the pilot requests, and radar monitoring is provided…All charted procedures with localizer coverage beyond the 18 NM SSV have been through the approval process for Expanded Service Volume (ESV) and have been validated by flight inspection.
A figure showing a chart for an ILS at Chicago O’Hare complements the note. It confirms that fixes along a localizer have been verified during the flight check process.

On the chart for the ILS to runway 14R at Boeing Field, however, the fix farthest out on the localizer is ISOGE, recently moved out to 12 nm from the runway, but still within the standard LOC service volume.

As the AIM notes, if ATC is monitoring you, controllers can direct you to join the LOC far from the airport, but such a clearance still leaves you with the problem of intercepting and tracking a course that may be wobbly—if it appears at all.
As the first part of the video shows, after loading the approach and transition, I select the appropriate course to an initial fix along the localizer, and I leave the CDI set to GPS. That setup, similar to using vectors-to-final, but preserving options if ATC changes the plan, draws a magenta reference line along the LOC that I can join and track inbound until I am close enough to receive a stable LOC signal, and then I switch the CDI to green needles.
When you are sure that you’re within the LOC service volume, change the CDI to LOC, and continue the approach with the approved lateral and vertical guidance for an ILS.
Because the weather was VMC when I flew the ILS for this video, I tested the technique and cross-checked what the LOC showed when I was far from the airport. The green needle was, to use a technical term, wonky, until I got close to ISOGE. My track would have been smoother and more accurate had I followed the magenta line until the LOC settled down near the initial fix.
