
My article about partial-panel IFR flight with modern electronic instruments, complemented with EFBs, is in the April 2024 issue of AOPA Pilot magazine.
If you’re an AOPA member, you can read it online here.

My article about partial-panel IFR flight with modern electronic instruments, complemented with EFBs, is in the April 2024 issue of AOPA Pilot magazine.
If you’re an AOPA member, you can read it online here.
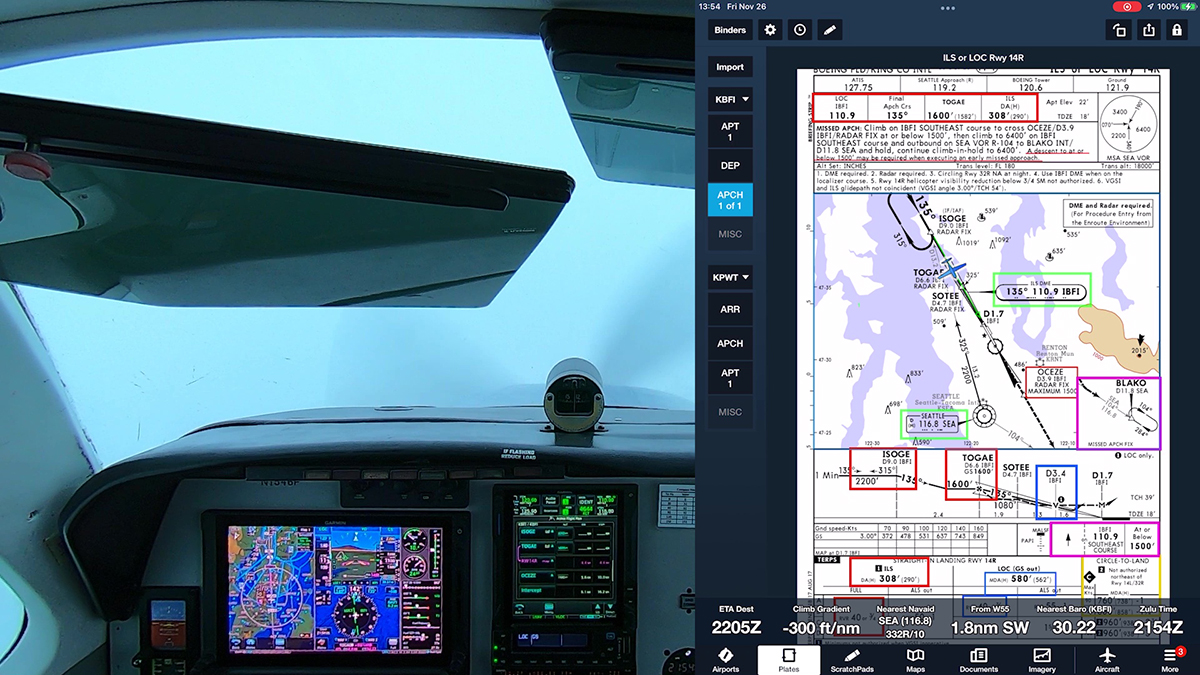
Here’s video from a recent IFR proficiency flight from Boeing Field (KBFI) to Arlington, WA (KAWO). After a departure in IMC, I flew the RNAV RWY 34 approach to LPV minimums at KAWO, using the GFC 600 autopilot for the approach and the TOGA feature for a coupled missed approach.
Notice the glory as I cruise just above a solid cloud deck with the sun at my back.
This video also shows my use of cockpit and avionics flows followed by checklists to prepare for an approach.
For more information about those techniques, see the following videos:
To learn more about how I set up the displays in my panel and in ForeFlight on my iPad, see “Sipping Information from the Right Glass,” my IFR Tip in the December 2023 issue of AOPA Pilot magazine (you may need an AOPA membership to read the full article).
My article about using VNAV is in the August issue of AOPA Flight Training magazine, here. I tried to address the most common questions and mixups that I see when folks use VNAV while flying approaches.
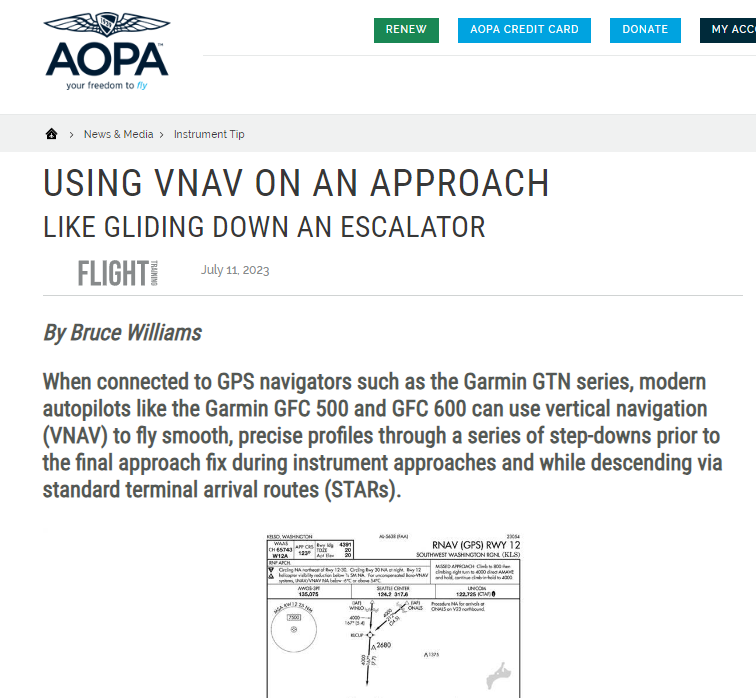
To see VNAV in action, watch this video at my YouTube channel.
The FAA Instrument Procedures Information Gateway now includes the new RNAV approaches to runways 14R and 32L at Boeing Field (KBFI) in Seattle that were published on August 10, 2023.
Boeing Field management contracted with Hughes Aerospace Corporation to develop these approaches, but they are public use, and the charts appear in the databases in EFBs and panel avionics.
Note that these are not Authorization Required (AR) approaches (for more information about that topic, see Unscrambling RNAV, RNP, and Other Chart Naming Conventions and Notes). The new approach to runway 14R replaces the old RNAV (GPS) Y procedure, and it’s a welcome supplement to the ILS RWY 14R, which is often out of service.
Both approaches offer LPV minimums for WAAS-equipped aircraft.
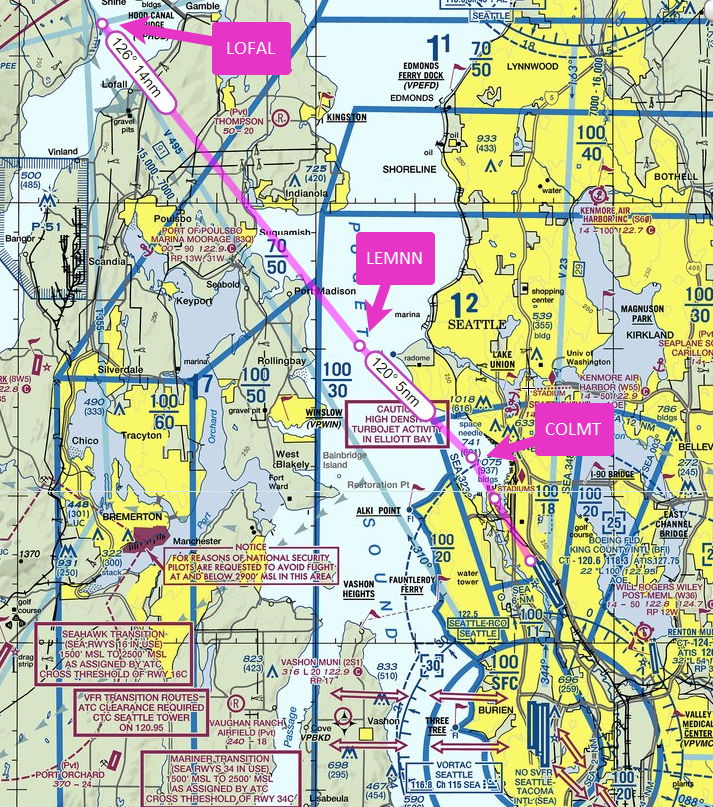
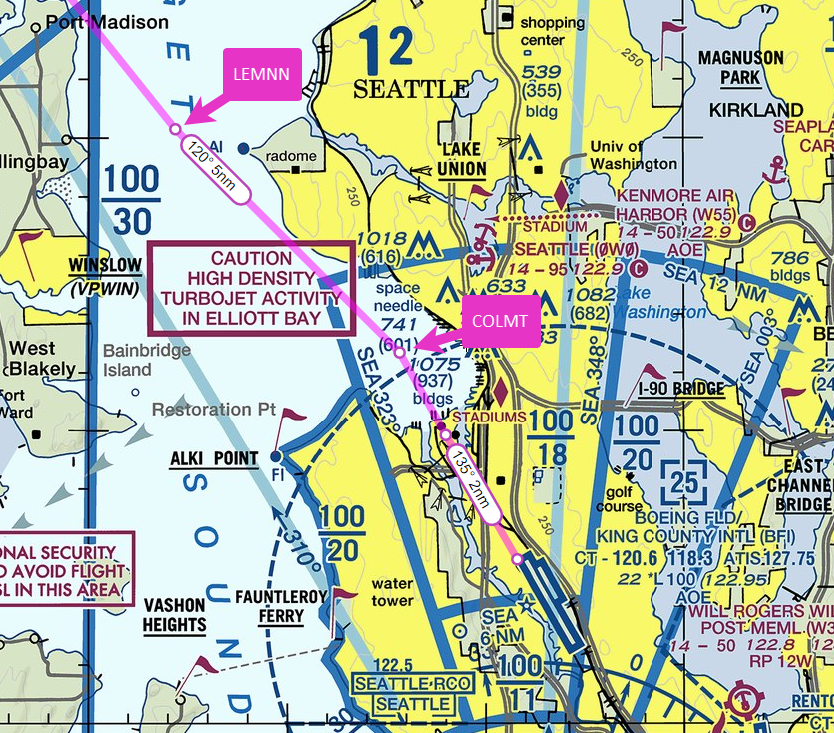
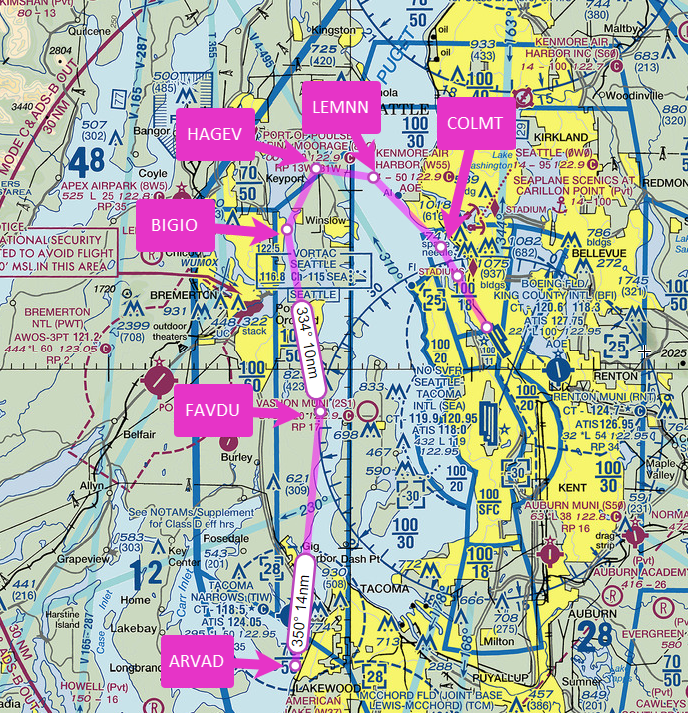
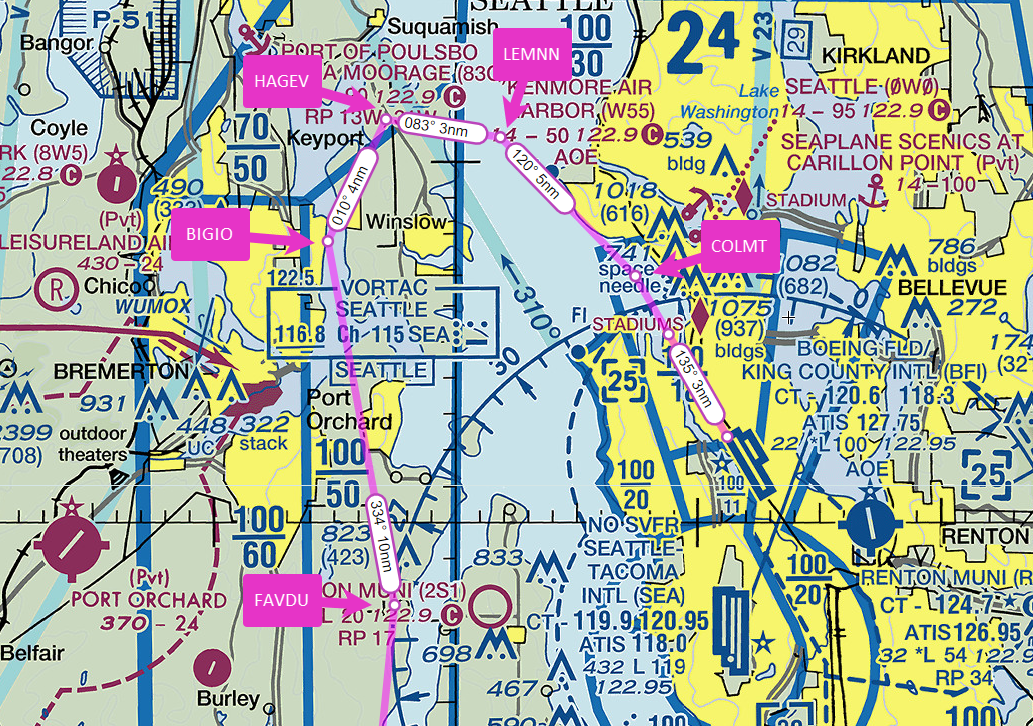
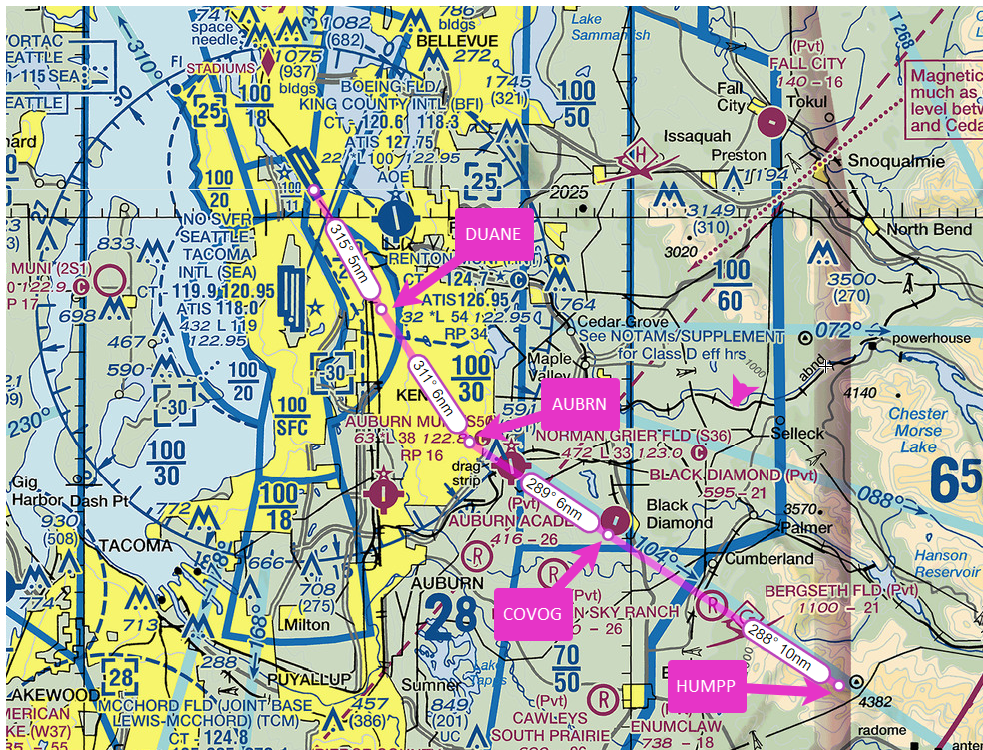
Here are detailed views of the new RNAV (GPS) RWY 14R approach, which features tracks through Elliott Bay, keeping low-altitude traffic (and noise) away from the Magnolia neighborhood. I transferred information from the approach chart to VFR charts (at SkyVector). The positions of the fixes and the tracks are approximate, but they help you visualize the new flight paths. (For similar views of the new RNAV (GPS) RWY 32L approach, scroll down.)
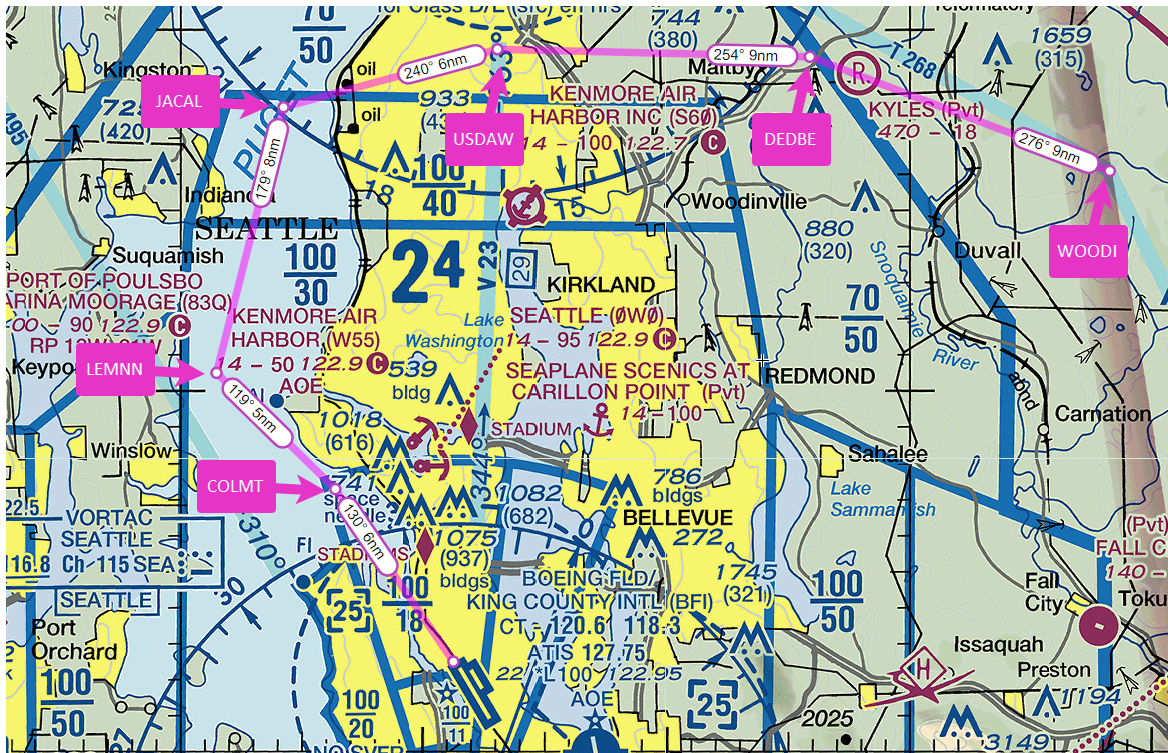
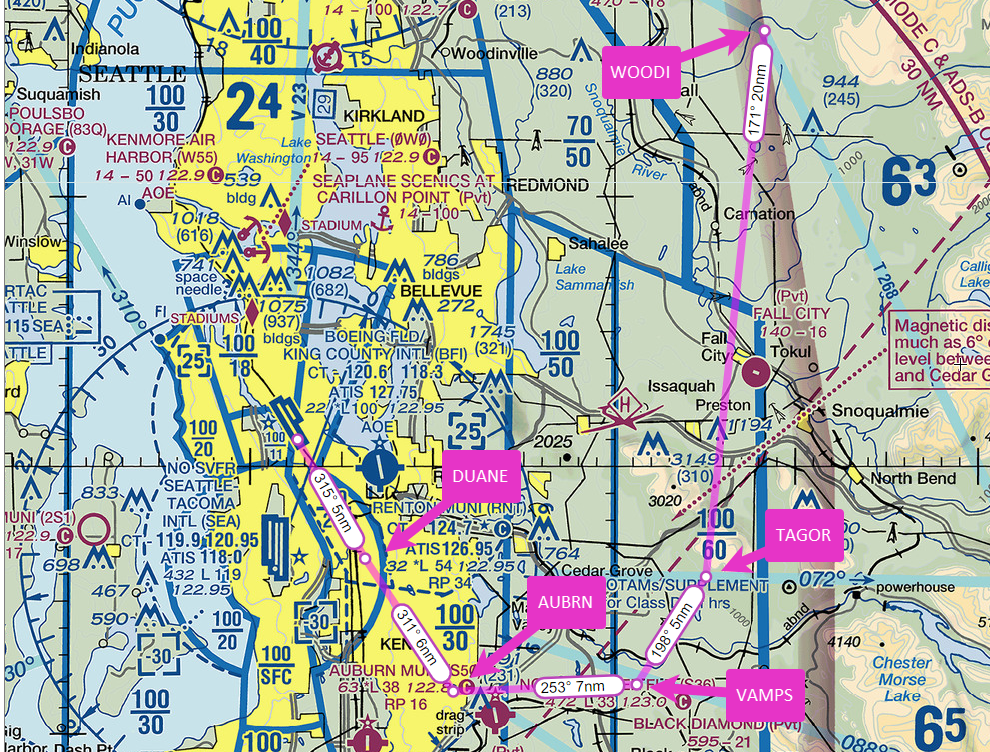
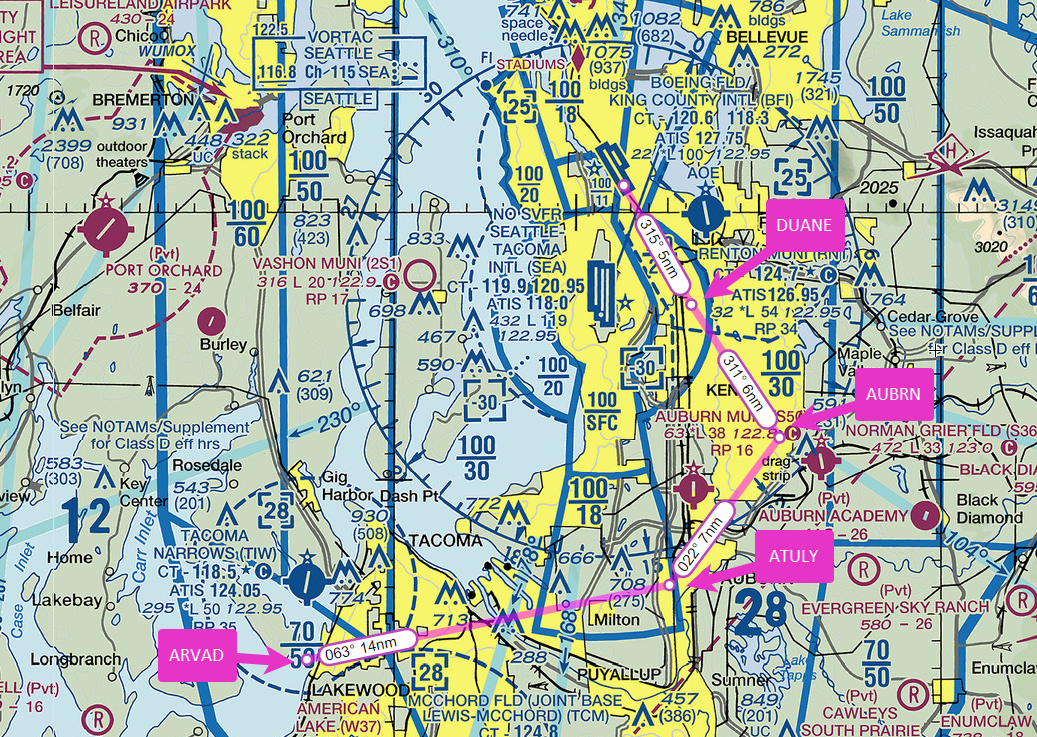
Here are views of the fixes in the new RNAV (GPS) RWY 32L approach.
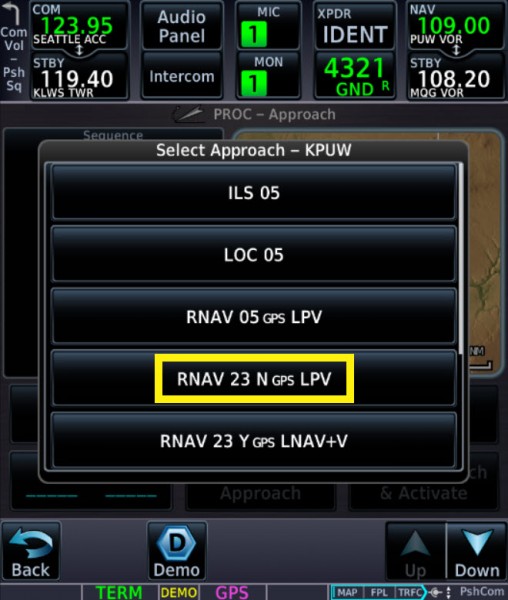
I recently ran across the RNAV (GPS) RWY 23 N Approach approach at Pullman, WA (KPUW).
Note the N in the procedure title. This approach appears in the procedures listed for KPUW in the GTN 750Xi in the Garmin PC Trainer Suite.
But you won’t find a chart for this approach because it’s a Special Instrument Flight Procedure (aka, a non-Part 97 approach). Section 1-6-5. Non-Part 97 Approach Procedure Naming in ORDER 8260.3E (part of TERPS) explains the naming conventions for such special procedures:
…straight-in approach procedures will be designated with the suffixes “M,” “N,” “P,” or “Q.” Circling-only approach procedures will be designated with the suffixes “J” or “K.”
…
a. The first approach established uses the suffix “M” (or “J” if circling-only) even though there may be no intention to establish additional procedures.
The database in the Garmin trainer includes the N approach to RWY 23, but not the M procedure to RWY 05, which is in the list described below. That list shows that these approaches at KPUW are maintained by Alaska Airlines, which operates Horizon flights to that airport.
Special instrument flight procedures may appear in the databases of the navigators that you use. You can find a list of special instrument flight procedures at the FAA website here.
But as that page notes, “Distribution of procedure documentation is restricted to authorized users in accordance with FAA Order 8260.60.” In other words, you can’t get the chart unless the FAA has approved you to fly a specific special instrument flight procedure.
For more information about approach naming conventions, see Z, Y, X in Approach Titles here at BruceAir.
The May 2023 issue of AOPA Pilot magazine includes PBN Bingo, an article I wrote to help pilots understand the key acronyms, abbreviations, and other terms associated with performance based navigation.
I also have a presentation on the topic on my YouTube channel: Unscrambling RNAV, RNP, and Other Chart Naming Conventions and Notes.
Charts for instrument procedures include a lot of information, and IFR pilots learn to brief departures, arrivals, and approaches as part of the preparation for takeoff, descent, and landing.
Often, however, those briefings aren’t especially effective, because the pilot or crew just recites data on the chart and doesn’t actually prepare to fly the procedure by describing a plan that includes details such as how:
In other words, just reading a chart aloud doesn’t truly prepare you to fly a procedure. It’s like trying to sight-read a piece of music instead of practicing before a recital. And too often, a traditional briefing is also rushed or juggled with other tasks, especially in an aircraft equipped with modern avionics.
Today most IFR pilots fly with at least some electronic displays and GPS navigators, and we use electronic flight bags—tablets and apps—to plan our flights on the ground and to display charts and related information in the air. Given the way we now fly IFR, it’s time to update the briefing process to reflect modern avionics and the tools we bring into the cockpit.
For a detailed explanation of how I teach procedure briefings, see:
I’ve been testing the latest system software in my Garmin avionics and checking out the A36 after its annual inspection. A break in the weather allowed a scenic VFR flight from Boeing Field (KBFI) to Tillamook, OR (KTMK) and a practice RNAV RWY 13 approach using the automation available with the Garmin GTN 500Txi, GTN 750Xi, and GFC 600 autopilot.
Enjoy the spectacular scenery along the Oregon coast south of Astoria as I descend into KTMK.
Sometimes just one cloud gets in the way when you’re flying an instrument approach.
In this video, I fly the RNAV (GPS) RWY 35 approach at Olympia, WA (KOLM), southwest of Seattle. Although the weather was mostly good VMC, and the Olympia airport was operating under VFR during my flight, as you’ll see, I had to go missed on the approach when I reached the MDA on this LNAV-only procedure because just one cloud blocked the view of the runway.
Because I have a WAAS-capable Garmin GTN 750Xi in the panel, I almost always have at least advisory vertical guidance when I fly an approach. The GTN shows +V to indicate an advisory descent path when you load a procedure like the RNAV (GPS) RWY 35. That capability lets me fly almost all approaches using the same profile and aircraft configuration that I use for an ILS or RNAV approach with LPV minimums.

On this day, had I intended to land, I could have leveled off at the MDA and continued toward the published missed approach point, and I probably would have been in the clear before I reached the threshold. But that strategy might have left me too high to make a smooth, stable descent to the runway. Indeed, on this day, with the airport itself essentially in the clear, had I really wanted to land, I could have canceled IFR well out along the final approach course and followed the tower’s instructions to enter a VFR traffic pattern.

But in actual IMC or marginal VMC, when I descend using an advisory +V glidepath, I use the point at which I reach the MDA as the missed approach decision point. By design, the intersection of the advisory glidepath and MDA typically puts you close the charted visual descent point (if a VDP is available). That’s the point at which you can leave the MDA and continue to the runway in a stable, normal descent.

This approach also helps illustrate another useful technique. As you’ll hear, I told the approach controller that I could accept vectors to the final approach course instead of flying a feeder route or course reversal. But as that plan came together, I didn’t use the VTF option in the GTN.

Instead, I selected CETRA, an IF, as the transition when I loaded the approach. Then I activated the leg of the procedure that ends at the FAF, CORER. The GTN drew a magenta line extending out from the FAF that I could use a reference as ATC vectored me to join the final approach course.
That technique avoids what I call the “vectors-to-final scramble.” Selecting an appropriate initial fix and then activating a leg or proceeding direct to a fix below the procedure title both activates the approach and preserves your options should ATC need to change the plan or, if you go missed and want to give the approach another try.
Here’s a look at a mostly bygone type of instrument approach: a PAR—precision approach radar—procedure. When you fly a PAR, a specially trained controller uses a short-range, highly accurate radar display to talk you down. The controller guides you left and right to remain on the extended runway centerline while also directing you to adjust your descent to follow the proper vertical path. In effect, you fly an ILS, but instead of using localizer and glideslope indicators to help you remain on track, you follow the controller’s instructions.
PAR were standard practice, especially at military airfields in the decades following World War II. You can see dramatized, but realistic depictions of PAR in movies, such as the conclusions of Strategic Air Command, starring Jimmy Stewart, and the first film in the Airport franchise, released in 1970.

The PAR controller in Airport (1970)
The radar displays and other electronics have been updated since, but the basic process remains the same even today. Although a PAR could be useful in an emergency, as in those films, today it’s unlikely that you’ll have a radar approach available nearby if your primary navigation equipment fails. But as I’ll explain a bit later, flying PAR approaches is still an excellent exercise.
In the U.S., only about 100 approaches with “radar minimums” remain in the system. Most of those procedures are at military bases, and the armed forces still use PAR in daily operations.

Some military facilities allow civilian aircraft to fly practice PAR approaches. The controllers need to practice guiding aircraft in, and they’re usually happy to provide the service. You just can’t touch down on the runway at the end of the approach.

In this video, I flew the PAR runway 15 at Gray Army Airfield (KGRF) near Tacoma, WA. It’s mostly home to helicopters, but it also serves fixed-wing aircraft and is part of the Joint Base Lewis-McChord complex.

There is no approach chart for a PAR. Instead, the critical details for radar procedures are shown in the “radar minimums” listings in the Terminal Procedures Publication for each region in which radar approaches are available.
Often when pilots fly a PAR, they load the corresponding ILS for the runway as backup. But for this video, I didn’t want to reference LOC and GS displays. Instead, I hoped to use the PAR to make an important point about instrument flying. As you’ll see, following the controller’s verbal commands forces you to use the control-performance method of instrument flying. You don’t have needles to chase, so you must smoothly and precisely fly specific headings while simultaneously making small pitch and power adjustments to track the correct vertical path. A PAR is a great exercise in precise aircraft control.
